Tuesday, December 28, 2010

The House - Walls and Roof Pt. 3

Hello All,

I write this from a cooler part of the world. I left sunny (and snowy) Europe on December 20 to spend the holidays in Canada. The trip back was made interesting by the massive snowfall that pounded Europe for days (VERY tongue in cheek!!). Seriously though, the 6 inches (15cm) of snow made air travel challenging. Many flights were canceled and the main hubs (Frankfurt) were either closed or on reduced landing cycles. The conclusion was that I spent 24 hours getting to Calgary, and was lucky to actually make in on the same day. Frankfurt airport was full of people that were not so lucky! I will spend a month in Canada and then return to Italy to continue on the house and to attend a trade show in Bolzano, where they will be highlighting the CasaClima trend. I missed it last year but thought that as I am building a CasaClima house I should attend.
So you are wondering what have I been up to. How is the house proceeding, and should Alec be taking off a month to go skiing in Canada?? You can let me know your thoughts AFTER reading this installment.
I left off last time with a partial roof complete. Well, I can tell you that the house is completely covered, and although we have not yet put the tiles on, the roof is 100% waterproof.

All the joists are up, ready for sheeting.

Up on the roof, finishing off the waterproofing membrane.

Roof is all closed in. Tiles will arrive in the spring.
So, for now, that's it for the roof. As winter was closing in, I decided that the outside of the house could be left the way it was. It wasn't going to rain or snow INSIDE, and my time could be spent working on the inside. 
So, check out the next installment, which is the beginning of the inside.
 

Sunday, November 7, 2010

The House - Walls and Roof Pt. 2

Hi All,

We have now started on the roof (well actually it's been a few days), but at the present we have finished half (the easy half!). The roof is a simple one, based on a main ridge beam, and tji joists spaced at 16 inches. We have waterproofed the plywood the half that is done is ready for the tiles. 
The crane remains an incredible asset. Without it, it would be a struggle.
Here are some pics of the roof as of today. We'll add more pictures as we proceed.

Flying the ridge beam, 42 ft long.

Ridge Beam installed, ready for the joists.

Flying the first joist....only 28 to go....

28 joists later, we're done. Ready for plywood.

The back side is done! Sheeted and waterproofed! Starting the porch.

The beginnings of a porch.....

OK campers, here's a puzzle for you. What's wrong with this picture:

What's wrong with this picture? BTW, after I took this picture, I went home!!

Sunday, October 31, 2010

The House - Walls and Roof Pt. 1

I should pause for moment in our Blog and explain what we are building. The house is going to be very energy efficient. We are proceeding with plans to have the house certified by an independent organization based in Bolzano Italy. This company certifies new and renovated buildings to establish what the energy consumption of that building is. Just like cars have a MPG or km/100l rating, so now will houses. Houses in all of Europe already have an energy rating, it goes from A to G. "A" being the best, and G being, well, and uninsulated barn with no windows is a good example. CasaClima, has decided to issue plaques for any house that falls into their evaluation of the energy catagory. They only consider house that are A, B or a new category they have developed call "oro" or Gold. They then decided that there should be a further subcategory for homes that have made the effort to use a minimal amount plastics or chemical based insulation during the construction. For example no PVC windows are allowed. However, PEX piping, which is in part made of plastic, is allowed. No polyurethane insulation is allowed so we will be using large amounts of fiberglass (certified green, of course) insulation and other green and FSC-certified products. The house will be a double frame house. There are a number of important considerations when we decided to make this house a "ORO +" or gold plus. CasaClima gives big points for high insulation (which includes windows, elimination of cold spots, etc), a well sealed house with high efficiency HRV systems (trading warm stale air for heated fresh air), and creativity of the heating system. In fact, no carbon fuel heating is allowed, only wood and a small electric water heater are allowed. The remainder of the heating requirement is to be generated by the house itself (the windows (solar energy) and the occupants and what they do on a daily basis (cook food, wash dishes and clothes, etc)) and through the use of solar cells (PV) or solar panels (hot water). We will be using a combination of these items.So we have had to design a house that will have lots of windows, will pass the infamous blower door test (they hook up an air pipe to the front door of the house and pressurize the house to check for leaks), and meet the rest of the criteria of CasaClima. What we came up with is a home that will have around 2000 sq ft (200 m2) and a huge high front facade that will be mostly window. There will be a side porch with a lower floor deck. The structure of the home will be a double frame wall. This is quite new and interesting (at least to us) and it resolves a number of problems inherent to this high level type of home. One of the first problems to resolve was to protect the vapour barrier. Creating a good vapour barrier is great (and relatively easy), but if you go and poke holes in it when you install your service lines (electrical and plumbing) then it's not much of a vapour barrier. Over the years we discovered that even with the best diligence it is very hard to completely stop the flow. So, the best way (we thought) was to avoid putting holes in it in the first place. So basically, all the services will be going on the inside wall, away from the vapour barrier! After that, it is simply a question of building walls deep enough to accommodate insulation to arrive at a U-value of .11 (walls) and .07 (roof), R-51 and R-81 respectively, or in our case, walls of about 14 inches. Windows will be triple pane with Krypton filled sealed units. So, of course there were some creative framing challenges which have kept me awake at nights and building "tall walls" (20ft high), has been a challenge. We have a small tower crane on site which has been very helpful, and the timely participation of Franco and Giovanni Motto's crew who come to assist in standing up walls whenever needed. 
The first cut picture (below)  was taken October 5 at around noon.
So without further explanation, let me show you some current pics.
This a very symbolic picture. It is the first cut, for the first wall.
It's a bit dark, but these are first walls to be raised. They are the South facing picture windows.

The East walls are up!

And the North walls go up.

South, East and North walls up, with part of the gable.

These were the 2 west walls going up. This created a closed in box. All we had left were the remaining parts of the south walls.

The west walls up.

The last of the walls and gable ends are UP! This means we get to start the roof!

Containers and Foundations

Hello all, We certainly hadn't expected on posting once every 3 months, but we've been busy building and that was most important.
And busy we have been.
Sara arrived in Piemonte and we setup house in our rented apartment (60 m2, about 600 sq ft) in the small town of Vico Canavese. This quaint little town is about 10 minutes up the valley from Lugnacco, and offers us a place to sleep and warm shower after a long day in the trenches. It's small, but has all the services you could want, from the various grocery stores, fruit vendors, bank, mechanic and gas stations.
We had to "modernize" the apartment a bit, as most of the appliances and furniture were from somewhere around the 50s. They apartment hadn't been used in many years we think. It turns out the parents passed away about 10 years ago, and to further lead us to believe that the apartment hadn't seen anyone for a long time was the calender from 2001! Anyway, after serious clean up (from Sara) and a few modern appliances (microwave and washing machine), we felt quite comfortable. We even installed an Internet dish, as the local phone company hasn't got around to ADSL up here yet.
Joe got used to Italian dogs. This is quite a statement, as their seems to be lots of dogs, and they all bark and snap at strangers. Not quite what our boy is used to. But he now seems to be just ignoring them, and has made friends with some others that just want to play and be friends.
On the house front, we have made serious headway!
After much patience our containers finally arrived! Just as the containers were loaded, we discovered that the port of Montreal had gone on strike and no freight was moving in or out of the port. So our containers were stuck in Calgary. Fortunately the strike only last a few short days, but the backlog of containers meant that out shipment was delayed over 3 weeks. Anyway finally they arrived in Genoa and after the usual customs bureaucracy the containers were dispatched from the port. The truck drivers got lost in the Valchiusella and after a few phone calls we droive down to rescue them. Anyway, the containers showed up finally and we started unloading them. It was like a big birthday party. So many presents. 
The first container arrived

And the doors swung open to reveal.....

... all the stuff we had packed in Calgary.


Joe, getting ready to move a load of trusses down the road.

Not as scary as it looks, but I wasn't driving....

The job done, and the labour sleeping on the job! 
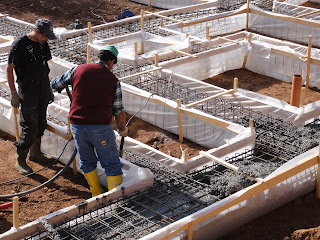
After some false starts with the rain (BIG mud!), things finally dried out and we were able to remove the rocks from the house and dig the foundation. We setup the boards and got work setting out the plastic bag, that all the Italians shook their heads at. However they were all willing to give it the benefit of the doubt until proven otherwise. 
Setting up the boards.

Laying out the plastic wrap....

.... and starting the over 2000 kg of iron.

Iron work ready for the pour.
One very serious challenge we had was trying to figure out how we were going to get concrete down to the property. We had a couple of companies look at the road, and they all said "no way". It seemed like the only way to do it was to mix the concrete down at the land in small batches, not something we wanted to do. After hunting around some more, I found a company that was willing to send their trucks AND a pump to pour the concrete. What a relief! We were very excited when the pumo showed up and the first load of concrete.

The pump showed up.....

.... and the first load of concrete mix.

And the pour started, very much to everyone's curiosity!

The pour continued.

And the trucks came and went.


We smoothed concrete as the pour progressed.

And by lunch, we had a fully pour foundation. WOW!
This was as of September 27, 2010. After letting the concrete set for a day or so, we then started on the job of preparing the "igloos" and wire mesh. The igloos are a dome like plastic box, that creates an air space under the foundation, so the concrete for the floors does not sit directly on the ground. It allows air to flow under the floor and reduces humidity. 
Once we had this ready, we called the pumper and cement trucks back to finish pouring the foundation slab.


The "iglus", ready for the final pour.


Joe, in his usual supervisory roll. Entertaining the workers.
The pour continues.
Moving some concrete around with homemade chute.
Cleaning up after the pour.
And finally, a completed finished concrete slab.


And so on September 1, 2010 we have a completed concrete slab ready to start building a house on top of. Yippee!!

Saturday, July 31, 2010

Early Days

Hello Everyone.
Welcome to Sara and Alec's Blog. We are embarking on a journey of creation.
As some of you will recall we purchased our piece of land in Northern Italy a couple of years ago, and have been in the planning process since. We now have all our permits and are commencing the project.
The House as purchased (1)
As many of you will also know, Sara and I have built 2 houses so far. We do most of the work ourselves, only "subbing" out the things that 1) we cannot do legally, 2) that require specialized machinery, 3) and that we don't like doing. This house will be no different, although I expect we will do even more, as I have better equipment this time. Sara has informed me that she intends on supervising, drinking wine and eating olives. Joe, of course will follow the food. Pretty good gig.....;)


So, this is the house as when it was purchased:

The house as purchased (2)


Many things have happened since starting the process. We have rerouted electrical wires (to get rid of overhead lines, which we view as ugly), drilled a well, dealt with torrential rains, dodged calabrone (an aggressive large wasp like insect that hurts when they sting you), loaded 2-40ft containers in Calgary and finally, knocked down the house in preparation for excavation.


Here are some pictures of the demolition process:

Gianpaolo on the roof removing the beams.

Alec in the backhoe knocking down a wall.

Power lines have been removed and ready for complete demolition
Front part and columns are down.

And everything reduced to a pile of rocks.